
This post may contain affiliate links. Please read our disclosure policy.
This Christmas cookie icing recipe that hardens is the secret weapon for beautifully decorated holiday cookies. It dries glossy, firm, and smooth, perfect for outlining, flooding, details, gingerbread houses, and any Christmas cutouts. And the best part? No raw egg whites. Just a few pantry ingredients and foolproof results.
Since you’re here for icing that actually sets, you’ll love my Cutout Sugar Cookies That Don’t Spread, my Christmas Marbled Sugar Cookies, Gingerbread Men Cookies, and this ultra-popular Christmas Fudge.
I made our traditional sugar cookies tonight and with this frosting recipe they turned out so much better! I love this recipe and the sheen of the hardened frosting on my sugar cookies. This had to be the easiest frosting recipe I’ve used and had a great taste too! Thank you for sharing. I will save it and use it again!

Let’s Chit Chat!
I actually fell in love with this style of icing years ago at a hotel, they handed me a little welcome cookie, and the first thing I noticed was that the icing didn’t smear. I stacked it in a napkin, tossed it in my bag, eventually ate it… and it still held that glossy, picture-perfect finish.
From that moment I thought, okay, I need to recreate this at home, not just for myself, but so anyone can make sugar cookies that look bakery-quality without stressing about runny icing or raw egg whites.
After a lot of testing (and way too many cookies), this is the recipe that captures that same magical finish: smooth, shiny, and totally smudge-proof once it hardens.
Why This Is the Best Cookie Icing Recipe That Hardens
- Uses simple ingredients you already have at home
- Dries with a gorgeous glossy finish thanks to corn syrup
- Perfect consistency for outlining, flooding, or writing
- Beginner-friendly – no meringue powder, no egg whites, no stress
- Ideal for Christmas cookies, gingerbread houses, and every holiday decorating project
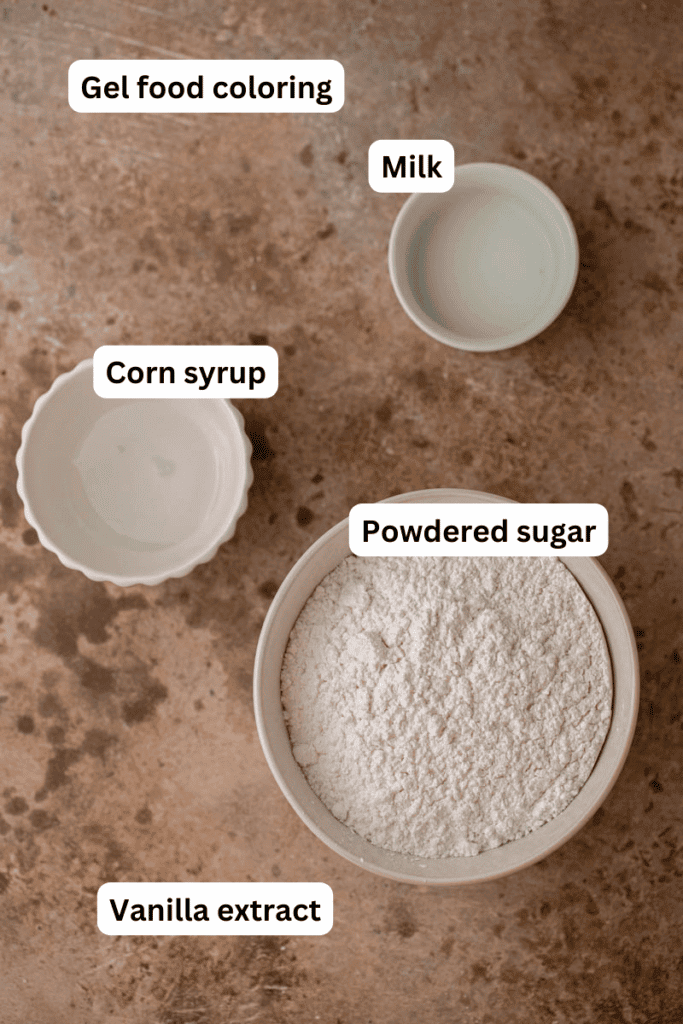
Ingredients You’ll Need
(Scroll to the recipe card for full measurements.)
- Powdered sugar (aka confectioners’ sugar)
- Corn syrup – gives the icing shine and structure
- Clear vanilla extract – for bright white icing
- Milk or water – adjust to reach your desired consistency
- Gel food coloring – vibrant color without thinning the icing

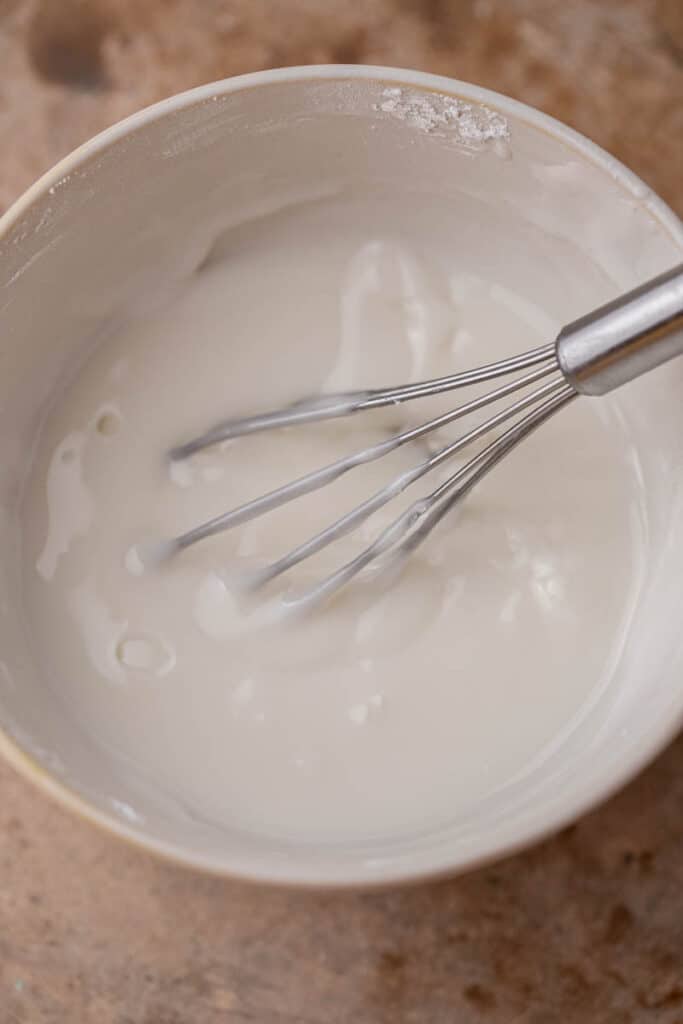
How to Make Sugar Cookie Icing That Hardens
- Mix the base: In a large bowl, whisk together powdered sugar, vanilla, milk, and corn syrup.
- Adjust consistency: Add tiny drops of milk to thin, or extra powdered sugar to thicken. For flooding, aim for it to be slightly runny. For outlines/details, aim for a thicker texture.
- Color the icing: Divide into bowls and tint each with gel food coloring.
- Decorate: Use squeeze bottles or piping bags with small tips. Let decorated cookies dry completely before stacking or packaging.

Recipe Tip For This Cookie Icing That Hardens
- Use powdered sugar made with tapioca starch instead of cornstarch, it blends smoother and eliminates that chalky aftertaste some icings get.
- Add liquid slowly. A few drops can take your icing from outline-thick to flooding-thin, so adjust in tiny increments.
- Stick to gel food coloring to avoid thinning the icing.
- Cover your bowls with a damp towel so the icing doesn’t crust while you work.
- Let cookies dry completely (6–24 hours depending on thickness) before stacking or packaging for crisp, smudge-free designs.
Frequently asked questions – FAQ
Store in a squeeze bottle or airtight container in the fridge for up to 3 days. Bring to room temperature before using.
Yes, but your icing won’t be bright white. It’s perfect if you plan to add food coloring anyway.
You can, but reduce the milk slightly since it adds extra liquid.
Add more powdered sugar until it thickens.
Try clear vanilla extract, almond extract, coconut extract, or lemon extract so the icing stays white.
Anywhere from 6–24 hours, depending on thickness and humidity.
Store fully dried cookies in an airtight container for up to 2 weeks. Separate layers with parchment to protect the designs.

Sugar cookie icing that hardens
Ingredients
- 2 cup powdered sugar
- 1 & 1/2 tbsp corn syrup
- 1/2 tsp vanilla extract
- 1 & 1/2 tbsp milk or water cold
- gel food coloring
Instructions
- Sift the powdered sugar in a medium/large bowl. Add in the corn syrup, vanilla extract, and milk or water. Stir vigorously until smooth.2 cup powdered sugar, 1 & 1/2 tbsp corn syrup , 1/2 tsp vanilla extract, 1 & 1/2 tbsp milk or water
- Add more milk is needed to get to your desired consistency. You want the icing to slowly fall off the spoon, leaving a pretty thick layer behind it.
- Divide the icing into multiple smaller bowls if making multiple different colored batches. Use to decorate cookies, let the icing set at room temperature before storing the cookies in an air tight container.gel food coloring
Nutrition information is automatically calculated, so should only be used as an approximation.
what kind of food coloring do you use? I want to put color in my frosting
I use gel food coloring!
Will the icing get sticky when the cookies are stored in sealed container?
The icing hardens nicely, but if cookies are stored in a sealed container with humidity, the icing can get a bit sticky over time. To keep them perfect, store the cookies in an airtight container at room temperature in a dry place. Avoid the fridge as condensation can cause stickiness as well if that’s a worry for you.
Will this recipe harden enough that the kids can write on the cookies with edible pens?
They sure will!
Hi, do you think that the iced cookies would be fine if frozen?
Yes! They should be fine!
What can I use in place of corn syrup?
I’d say honey might work the same in this recipe but it wouldn’t give you that extra white color in your icing. If you are going to color your icing then it would work better.
These cookies can be stored for up to 2 weeks but can they be frozen? If so, for how long?
Yes, you can freeze these cookies! Make sure they are completely cooled and the icing is fully set before freezing. Store them in an airtight container or freezer-safe bag, and they’ll keep well for up to 2-3 months. Thaw at room temperature before enjoying.
I am curious if you think that I could put the iced cookies in my dehydrator (on the lowest temp./setting) so as to help speed up the drying process of the icing? Thank you so much for sharing this recipe! Looking forward to icing my cookies!
I have never tried putting my iced cookies in a dehydrator so I am not sure. I wouldn’t recommend it because it might dry out your cookies more than you’d like. Just allow them to air dry. This icing tends to set pretty fast to be honest!
Worked really well! Could the icing be made up ahead of time? Like a few days before?
Yes, you can definitely make the icing ahead of time! Just store it in an airtight container in the fridge. When you’re ready to use it, let it come to room temperature and give it a good stir before applying. If it thickens up too much in the fridge, you can add a tiny bit of warm water or milk to loosen it up. Glad it worked well for you! 😊
Hi Chahinez, I am going to try this recipe as it seems easier than using egg whites etc. and will be quicker to make up a batch while the children impatiently wait to ice their gingerbread men at Christmas. I’m wondering if you use ‘icing sugar mix’ (containing cornstarch) or ‘pure icing sugar’. Does it make a difference?
I prefer the pure icing sugar without cornstarch because cornstarch adds a weird after taste to cooking icing. If you don’t plan on eating the gingerbread men/houses then it doesn’t matter as much. So to avoid that aftertaste, stay away from the cornstarch ones.
How long before can the icing be made before it hardens? Can it be made the night before?
It can be made the night before just made sure to cover it with plastic wrap so it doesn’t harden on top.
Simple to make and easy to use! The texture is a little different than any other kind of frosting I’ve worked with, but in the end it creates such a smooth and shiny surface. I used non-gel food coloring and had no issue with the consistency. I just added a little less milk like the FAQ said.
So glad you enjoyed this recipe!