This post may contain affiliate links. Please read our disclosure policy.
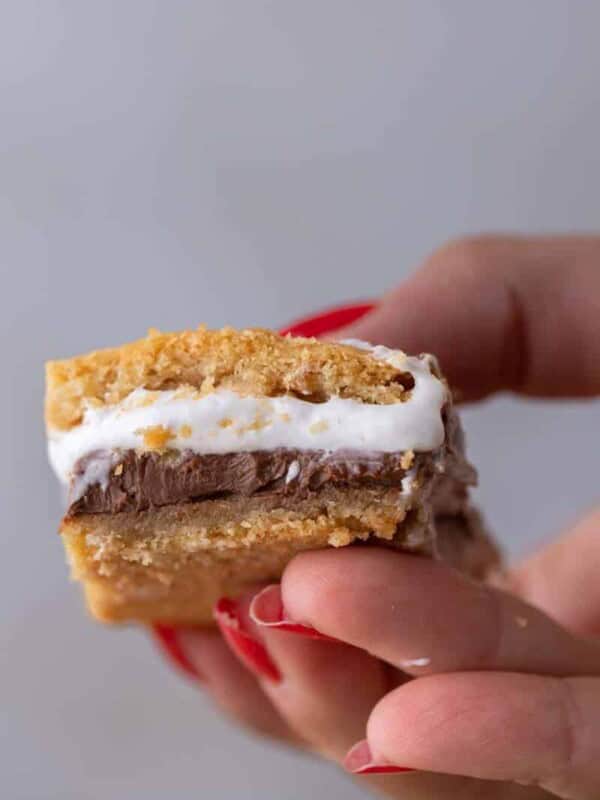
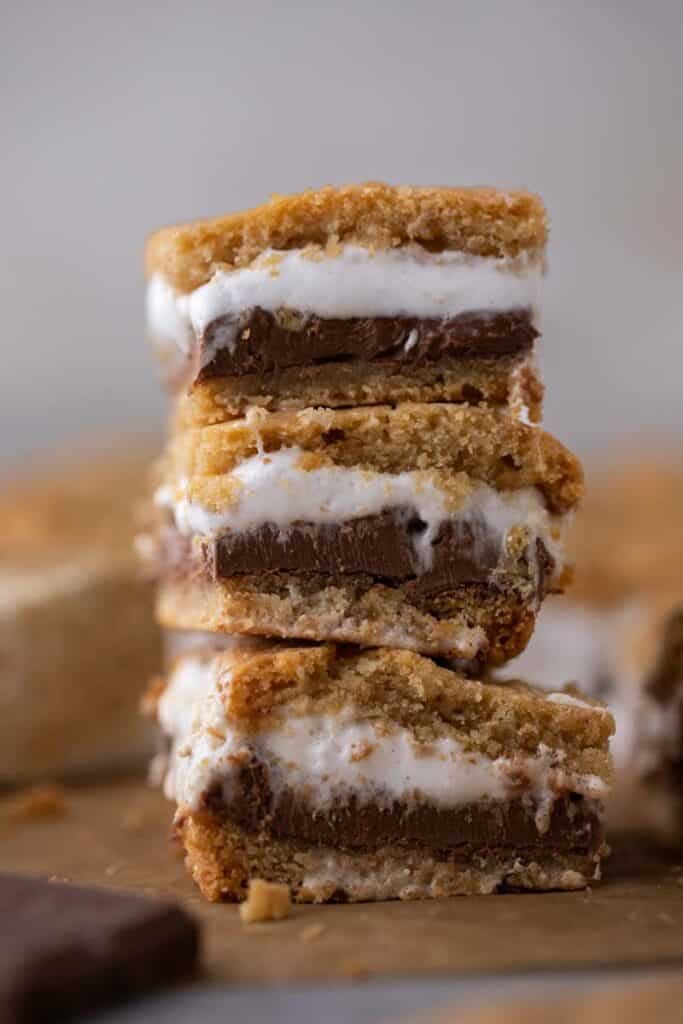
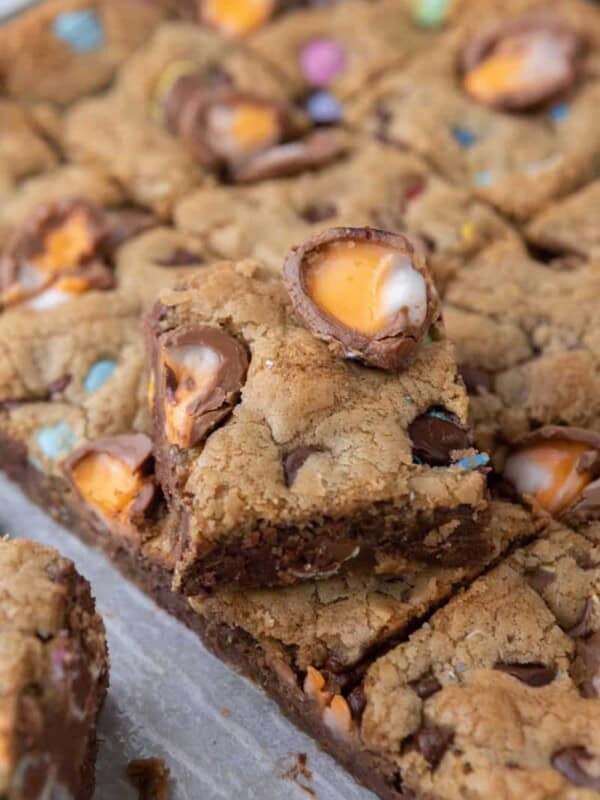
S’mores cookie bars give you everything you love about a campfire s’more in bar form, layered between two slabs of graham cracker cookie dough with Hershey’s chocolate and marshmallow fluff in the middle. No campfire, no sticky fingers, no weather excuses. Just slice into one and the center pulls like taffy.
If you love these, you’ll also want to try my Crumbl s’mores cookies, my Starbucks s’mores bars, and these s’mores brownie cookies.
Had my eye on recipe for a while and decided to finally try it. Mine came out exactly like the pictures. I measured ingredients by grams and divided the dough mixture in half. I had 8×8 liners which made it really easy to spread them out with a rolling pin and shape them. These taste way better on day 2 and 3 so I highly suggest making them a night before. I used a 7oz jar of marshmallow fluff and that worked perfect. Also Hershey almond for some extra crunch. These are so addicting and worth the effort. I very rarely leave reviews btw 😊

Let’s Chit Chat!
You know that random craving for a s’more that hits at the most inconvenient time? Middle of winter. Random Tuesday in February. 10pm when you’re already in bed. That’s how this recipe started for me.
I kept wanting s’mores without the whole production. No fire pit, no skewers, no marshmallows catching on fire and falling into the coals. I wanted the layers (graham, chocolate, marshmallow), the contrast (crunchy edge, gooey middle), and the nostalgia, all in something I could bake in my oven in under an hour.
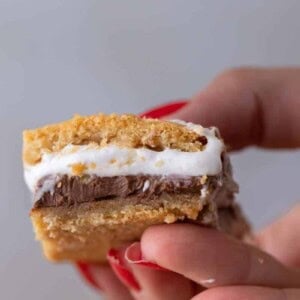
S’mores cookie bars hit every single one of those marks. And honestly, I think they’re better than the real thing. The graham cracker cookie dough is soft and chewy instead of dry and crumbly. The chocolate actually melts into the dough. And the marshmallow fluff stays gooey forever, so you get that pull-apart moment every single time you slice into them.
Why You’ll Love These S’mores Cookie Bars
- Year-round s’mores. No campfire required. Just an 8×8 pan and a preheated oven.
- Graham cracker cookie dough on the top and bottom, so every bite tastes like the real thing.
- Thick, gooey marshmallow layer thanks to marshmallow fluff (not mini marshmallows, I’ll explain why below).
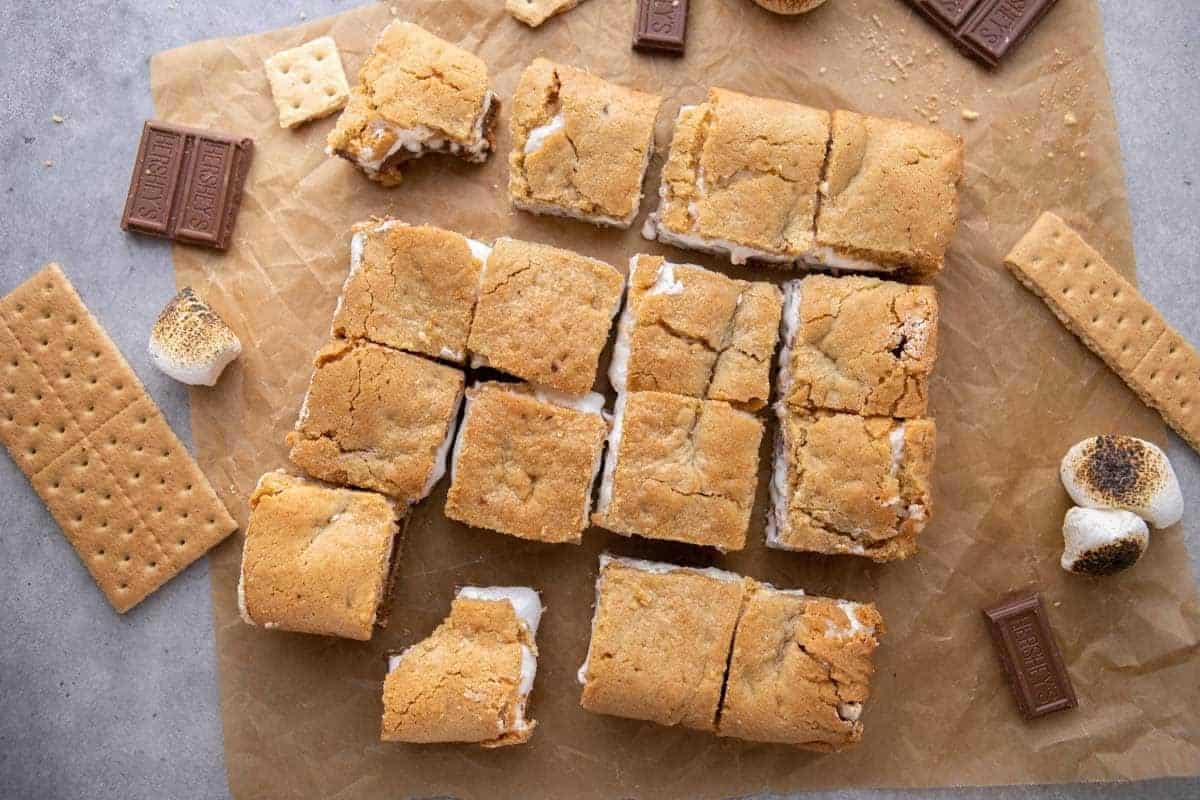
- Clean cross-section that looks gorgeous when you slice them, perfect for gifting, parties, or a photo if you’re into that.
- Reader-tested and loved. 4.93 out of 5 from readers who’ve baked them and come back to review.
Ingredients You’ll Need
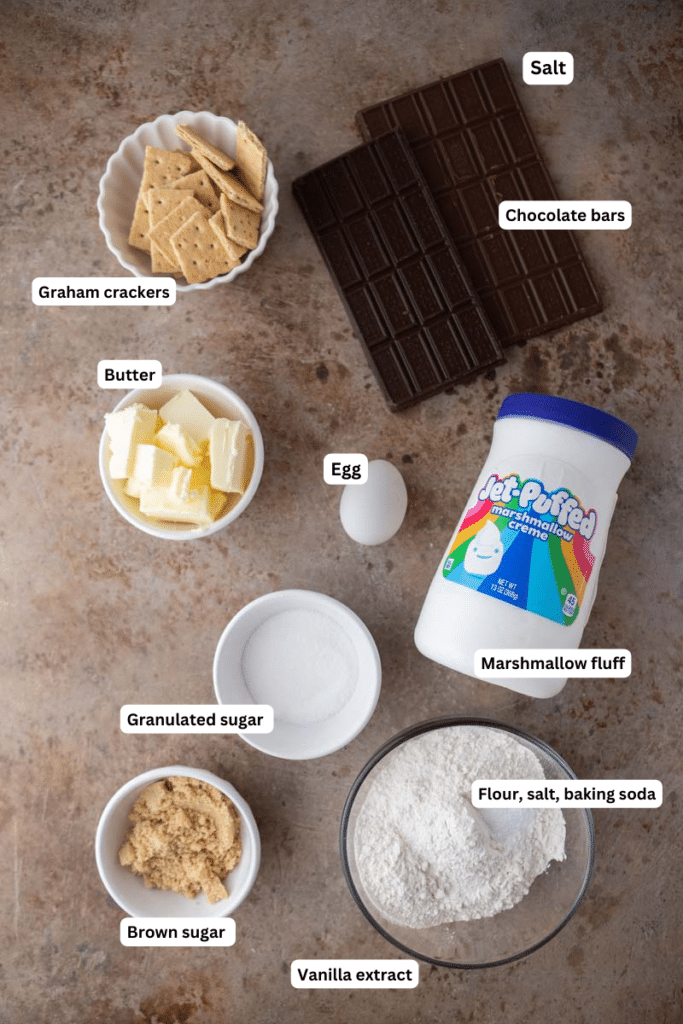
Full measurements are in the recipe card below. Here’s what each ingredient is doing so you know what you can swap and what you can’t.
For the graham cracker cookie dough:
- Butter, softened – salted or unsalted both work. If you use unsalted, don’t skip the added salt.
- Brown sugar + granulated sugar – brown sugar for chew and molasses depth, granulated for crisp edges.
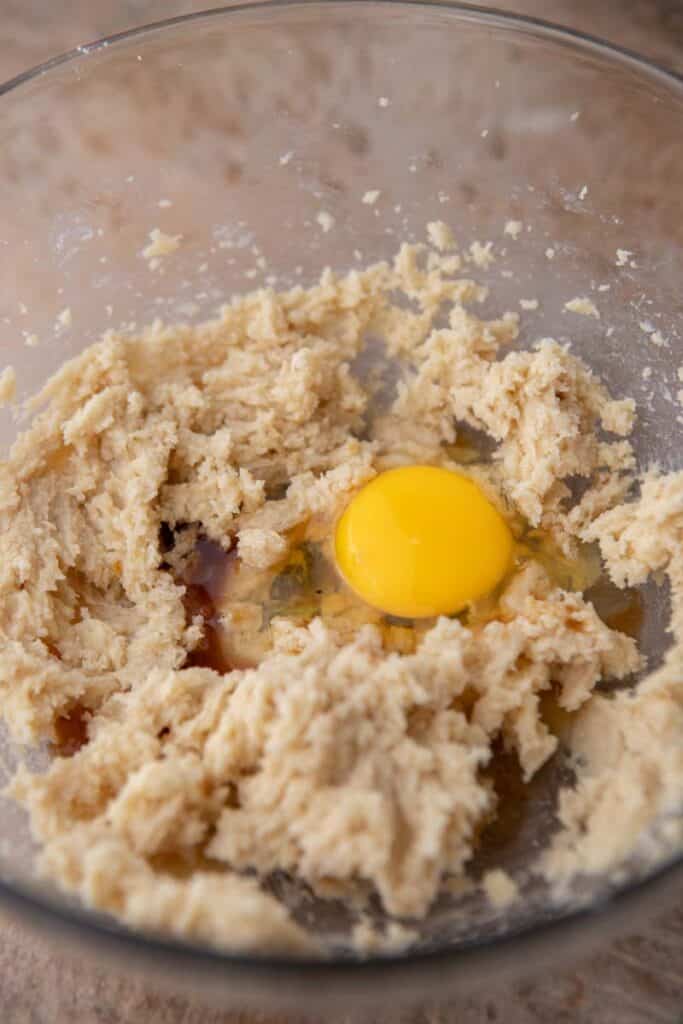
- Egg – one large egg binds the dough.
- Vanilla extract – a full teaspoon, don’t skimp.
- All-purpose flour – measured by spooning into the cup and leveling, or weighing (much better).
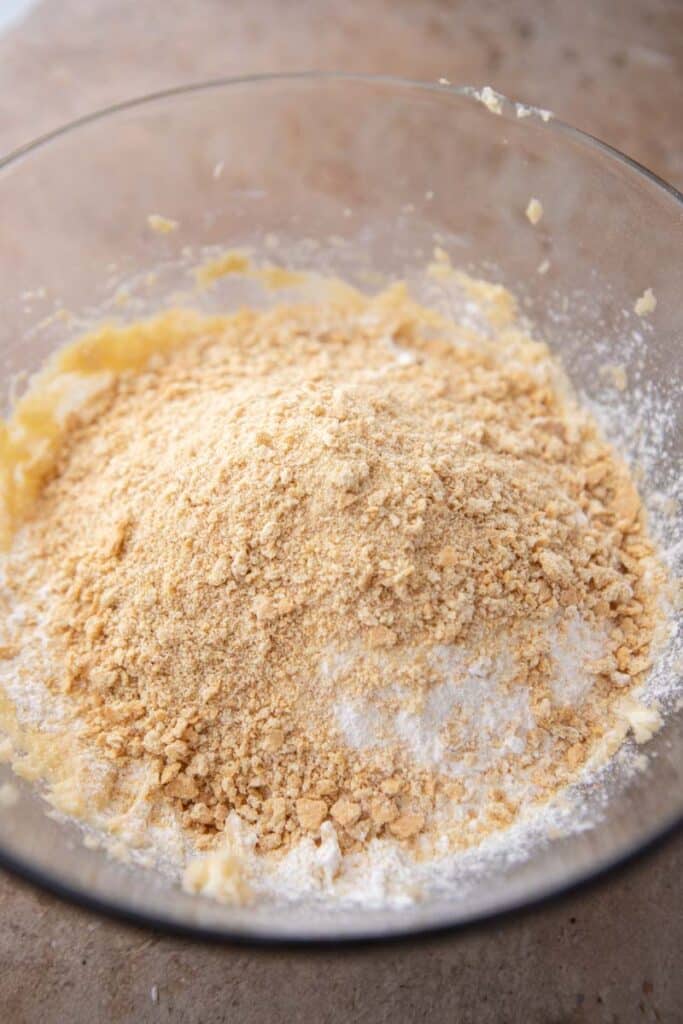
- Crushed graham crackers – about 3.5 full sheets, crushed fine. This is what makes the dough taste like s’mores and not just cookie dough. Don’t skip or sub.
- Baking soda + salt – baking soda for lift and browning, salt for balance.
For the s’mores layer:
- Hershey’s chocolate bars – 5 standard bars. Hershey’s is the s’mores default but any chocolate bar works. Milk chocolate stays truer to a classic s’more, dark chocolate cuts the sweetness if the fluff feels like a lot to you.
- Marshmallow fluff (also called marshmallow creme) – this is non-negotiable. More on why below.
How to Make S’mores Cookie Bars
Full step-by-step is in the recipe card. Here’s the overview with the technique notes that make the difference.
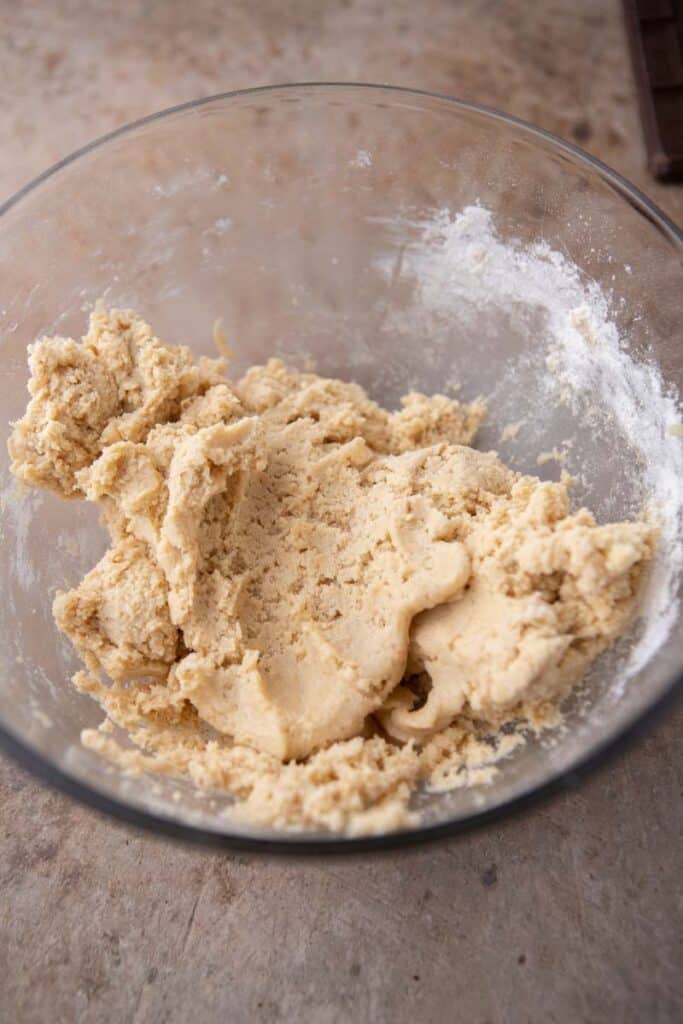
- Make the graham cracker cookie dough. Cream butter with both sugars until light, then mix in the egg and vanilla. Add flour, crushed graham crackers, baking soda, and salt. Mix just until the flour disappears, overmixing makes tough bars.
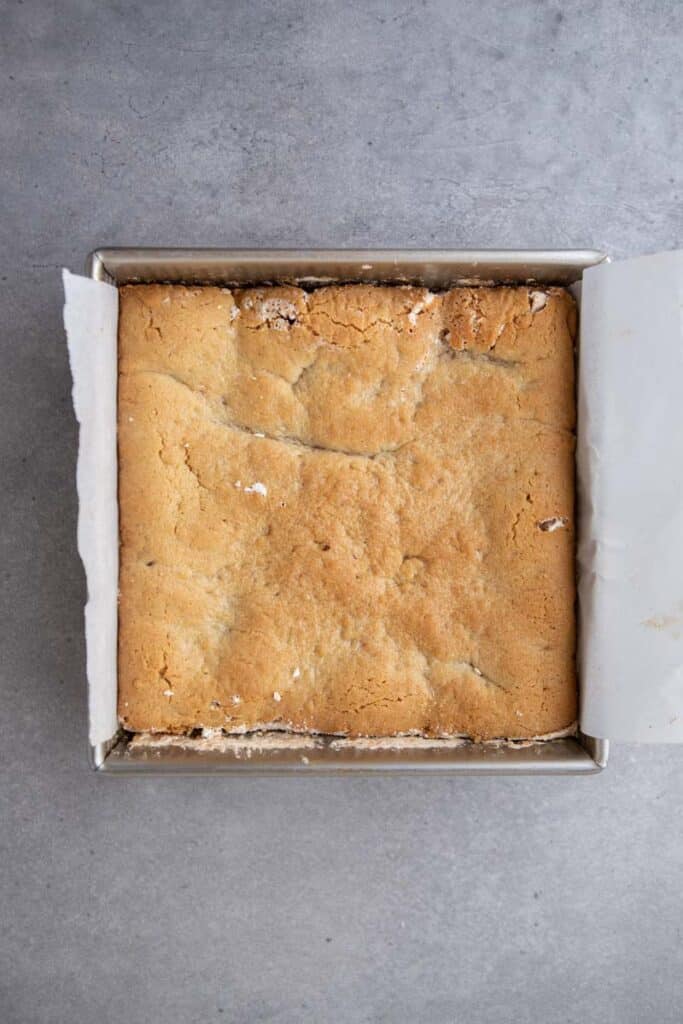
- Press half the dough into a parchment-lined 8×8 pan. Use the bottom of a measuring cup to get it flat and even.
- Lift that dough layer out with the parchment and freeze it on a baking sheet while you build the bottom. This is the trick for a clean top layer that doesn’t tear when you transfer it. If you skip this step, the top dough will rip and the marshmallow will ooze.
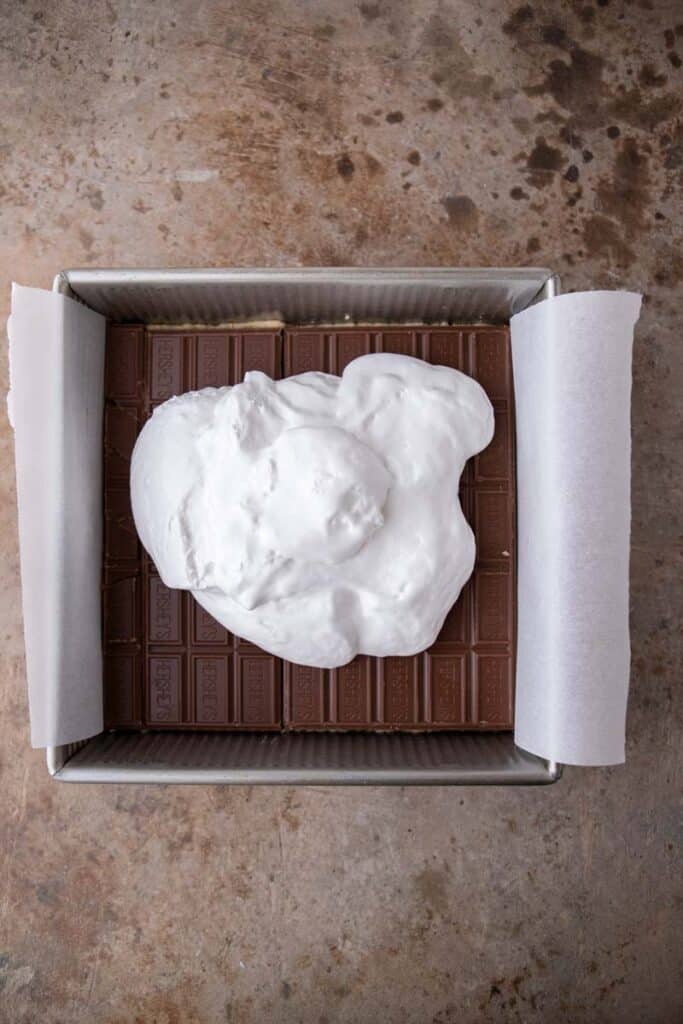
- Re-line the pan, press the second half of the dough into the bottom. Lay the Hershey’s bars across the dough, breaking pieces to fit any gaps.
- Spread the marshmallow fluff over the chocolate. Don’t worry about going all the way to the edges, it’ll spread as it bakes.
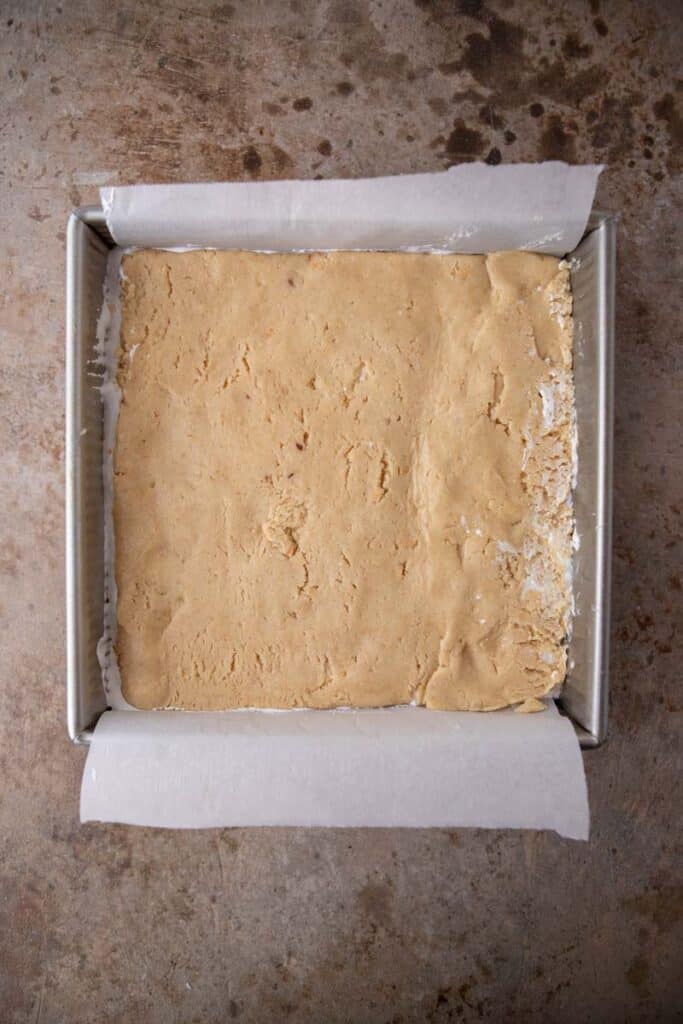
- Flip the frozen top layer of dough on top. Use the parchment to help you guide it. Peel the parchment off once it’s in place.
- Bake until the top is golden.
- Cool completely before slicing. I know. I know. But if you slice them warm, the marshmallow won’t set and you’ll lose the clean cross-section. Give them at least 2 hours at room temperature, or speed it up with 45 minutes in the fridge.
What Makes These S’mores Bars Different from Traditional S’mores?
A traditional s’more is a roasted marshmallow and a square of chocolate sandwiched between two graham crackers, eaten outside, usually with the marshmallow dripping down your wrist.
These s’mores bars take those same four elements (graham, chocolate, marshmallow, plus a little structure) and bake them into a sliceable cookie bar. The graham cracker shows up as cookie dough. The chocolate is a full bar in the middle. The marshmallow is fluff, which stays gooey even after baking. And the whole thing holds together so you can pack them in lunches, bring them to a picnic, or stack them on a platter without everything falling apart.
If you’ve ever wanted s’mores without the mess or the campfire, this is the version you’ve been looking for.
Tips for Perfect S’mores Cookie Bars
- Weigh your flour if you can. 1½ cups of flour can range from 180g to 220g depending on how you scoop. Too much flour is the #1 reason cookie bars come out dry and cakey.
- Don’t skip freezing the top layer. This is what makes the clean “stacked” look possible. Warm dough will tear and stretch when you try to transfer it.
- Use full-size Hershey’s bars, not chocolate chips. Chips won’t give you that continuous melty chocolate layer. You need the bars.
- Let the bars cool fully before slicing. This is the single biggest thing between “they taste great but look messy” and “they taste great and look incredible.”
- Wipe your knife between cuts. Run a sharp knife under hot water, dry it, slice, wipe, repeat. Clean edges every time.

Variations and Substitutions
- 9×13 pan – double the recipe and bake for 30–35 minutes. Check for golden top.
- Milk vs. dark chocolate – Hershey’s milk is the classic s’mores move. Dark chocolate cuts sweetness if the fluff feels heavy. Both work.
- Add chocolate chips to the dough for extra chocolate moments in every bite.
- Swap in Hershey’s with almonds for crunch, like reader Luz mentioned in her review.
- Biscoff swap – sub crushed Biscoff cookies for the graham crackers for a caramelized, cinnamon-forward twist.
- Peanut butter s’mores bars – swirl 2 tablespoons of peanut butter into the marshmallow fluff before spreading.
How to Store S’mores Cookie Bars
- Room temperature: Store in an airtight container for up to 3 days. The marshmallow layer stays gooey the whole time.
- Refrigerator: Up to 1 week in an airtight container. The texture firms up cold, so let them come to room temp for 15 minutes before eating, or microwave for 10 seconds for that fresh-baked gooey feel.
- Freezer: Wrap individual bars in plastic wrap, then place in a freezer bag. They freeze beautifully for up to 2 months. Thaw at room temperature for a few hours, or microwave for 20 seconds from frozen.
- Make-ahead tip: You can make the dough a day ahead and refrigerate it. Let it sit at room temperature for 15–20 minutes before pressing into the pan so it’s workable.
Frequently asked questions – FAQ
They’re closely related. S’mores bars is a broad term for any bar dessert inspired by s’mores, which can include blondie-style bars, no-bake bars, or cookie bars. S’mores cookie bars specifically means the version made with cookie dough as the top and bottom layers, which is what this recipe is.
I don’t recommend it. Marshmallow fluff gives you that signature pull-apart gooey center that stays gooey even after the bars cool. Mini marshmallows melt and then set into a chewy, firmer layer, so you lose the ooze. If fluff isn’t available where you live, a jar of marshmallow creme is the same thing under a different name.
Usually this is underbaking or slicing too early. The center needs to fully set while it cools, so give them at least 2 hours at room temp. If the dough around the edges looks baked but the center hasn’t set after cooling, bake them 2–3 minutes longer next time.
Yes. These actually taste better on day 2 and 3 (multiple readers have said this in the comments). Make them the night before you need them, let them cool fully, and store in an airtight container at room temperature.
Yes, if you want to simplify. Use refrigerated chocolate chip cookie dough or sugar cookie dough for the top and bottom layers. You’ll lose the graham cracker flavor in the dough itself, but it still tastes like s’mores overall because of the chocolate and marshmallow center.
Yes. Double everything and bake for 30–35 minutes. Check at 30 and add time if the top isn’t golden.
Absolutely. Swirl 2 tablespoons of creamy peanut butter into the marshmallow fluff before spreading it over the chocolate layer.
3 days at room temperature, 1 week in the fridge, or 2 months in the freezer, all in an airtight container.
If you want to simplify this recipe even more, you can use the premade dough for the top and bottom layer of cookie dough and fill the center as you would the regular one. The cool thing is that you can use the store-bought chocolate chip cookie dough or any other cookie dough you like for this!
S’mores cookie bars
Equipment
Ingredients
Cookie dough
- 1/2 cup Butter softened, salted or unsalted
- 1/3 cup brown sugar
- 1/4 cup granulated sugar
- 1 egg
- 1 tsp vanilla extract
- 1 &1/2 cup AP flour
- 1/2 cup graham crackers finely crushed, about 3.5 sheets, for the cookie dough
- 1/4 tsp salt
- 3/4 tsp baking soda
- 5 standard Hershey bars
- 1 & 1/2 cup Marshmallow fluff
Instructions
- Preheat the oven to 350F then line an 8×8 inch baking pan with parchment paper and set it aside.
- Cream the butter, granulated sugar, and brown sugar until combined. Add in the egg and the vanilla extract and mix again.1/2 cup Butter, 1/3 cup brown sugar, 1/4 cup granulated sugar, 1 egg, 1 tsp vanilla extract
- Add in the flour, graham cracker crumbs, salt, baking soda, and mix just until the flour mixture disappears.1 &1/2 cup AP flour, 1/2 cup graham crackers, 1/4 tsp salt, 3/4 tsp baking soda
- Press half of the dough evenly onto the prepared baking sheet then remove that parchment from the pan and place in the freezer while you re-line the pan with more parchment paper and repeat the process with the leftover cookie dough.
- Place the chocolate bars over the dough, feel free to break pieces apart to fit the whole surface. Spread the marshmallow fluff or creme on top of the chocolate bar then gently flip the chilled cookie dough layer on top working carefully to keep it intact.5 standard Hershey bars, 1 & 1/2 cup Marshmallow fluff
- Bake the cookies in the preheated oven for 25 minutes. Make sure you let the bars cool down fully before slicing into them to get that beautiful cross section that you see in my images.
Notes
- Make-ahead: These bars taste even better on day 2 and 3. Make them the night before you need them.
- Storage: Room temperature for 3 days in an airtight container, 1 week in the fridge, or 2 months in the freezer.
- Gram measurements: For best results, weigh your flour. Too much flour makes the bars dry and cakey.
- Chocolate swap: Any chocolate bar works. Milk chocolate keeps it classic, dark chocolate cuts the sweetness.
- 9×13 pan: Double the recipe and bake for 30–35 minutes.
Nutrition
Nutrition information is automatically calculated, so should only be used as an approximation.

My kid’s birthday’s are one day apart so we had a cookout and I made these instead of cake. Needless to say everyone loved them!!
Going to make them next time we go camping or to future cookout’s. Definitely recommend
Thank you so much and glad they were a hit!
oh my god these are sooo good, i am afraid of how fast i may eat this entire pan…
I struggle with the same problem lol!
These were good, but looked nothing like the photo. No nice layers. It seems like the fluff disappeared, and I used more than the recipe called for. And 10 minutes to make? It took 10 minutes to get the first sticky layer spread out in the pan, probably 30 minutes total to put it together. I’m a seasoned baker and had a hard time with this. Next time I will add slightly more crushed graham crackers to the dough. I will definitely give them another try!!
Hmm, the layers may have disappeared from pressing too hard when putting on the top layer, or if you sliced them into layers if they weren’t fully cooled. Give it another shot and let me know 🙂
Delish!! Working on new recipes for my son’s cookie table at his wedding and these are fab. Only thing I need is moar fluff!!!
Ahh that’s so special!! I love that you’re making treats for his cookie table, such a fun tradition. I’m so glad you enjoyed these!
Made these for a gathering and they were a huge hit! Very rich so a small piece was plenty for each person, and I’ll definitely be making them again.
Recipe was amazing, family loved! Thank you for putting the measurements with the directions!🙌🏻 scrolling back and forth is so frustrating.
I’m glad it was helpful!
can you make this with marshmallows instead of the fluff?
Fluff is best just because it’s easier to spread.
can you make the cookie part and freeze it ahead of making it?
Yes you can 🙂
Haven’t made these yet, but HUGE shout out to you for putting the ingredients with each step!!! It’s such a pain to keep scrolling up and back each time!! Awesome!! Trying these tomorrow for 4th of July 😊
I’m glad that was helpful! I hope you liked them!
Can you toast the fluff? Also, do you freeze the top and bottom layer, or just top?
Sure you could use a torch to toast the fluff before putting on the top cookie layer, that’s a pretty good idea actually! And it’s only the layer that goes on top that gets frozen. It’s just to prevent it from burning while the layers underneath cook.
Oh my god! These were sooooo good! And super easy to make. Mine didn’t take 5 bars and I made the mistake of not buy enough fluff (I was missing half a cup) but it turned out amazing.